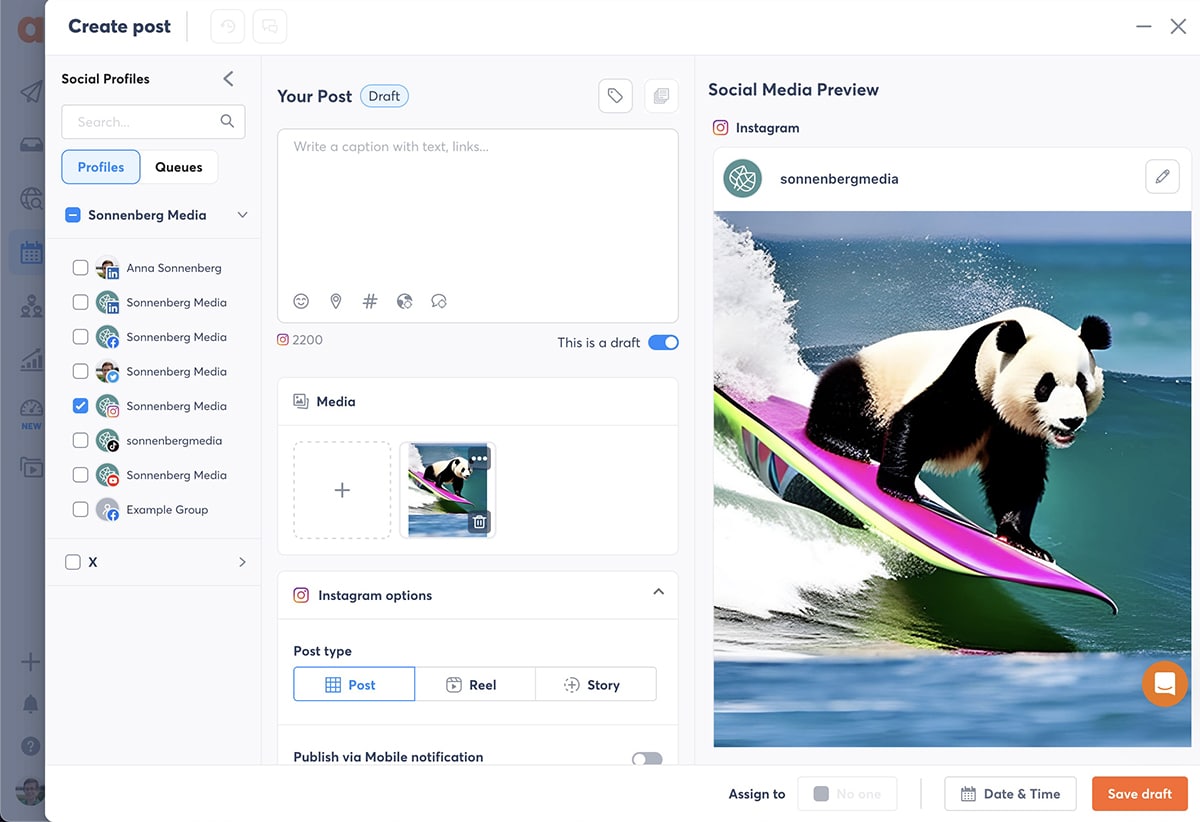
Could your social media content use a refresh? Want to help your brand stand out in the feed without investing a ton of resources in content creation? With Canva’s AI toolbox and Agorapulse integration, you can now create, edit, and publish eye-catching images to your social channels faster than ever.
In this guide, we’ll cover everything you need to know about Canva’s AI tools, so you can start creating more efficiently—and schedule your content seamlessly via Agorapulse.
If you’re already an Agorapulse user, check out this video by Jacob Hilpertshauser walking you through the Canva integration:

Sign up now for a free trial of Agorapulse!
What to Consider When Using AI in Social Media Marketing
Artificial intelligence tech like Canva AI can help your social media team save a lot of time. But before you add these tools to your workflow, it’s crucial to understand some potential drawbacks.
Top concerns of using AI for social
- Limited creativity
- Possible inaccuracies
- Perpetuating biases
1. Limited creativity
If you’re used to developing social media content from staged photoshoots or graphics from your design team, using AI might seem a little like applying a cheat code to your workflow. You might even worry that AI could compromise your creativity on social media.
These are valid concerns that you can manage by setting up guardrails for your team. Here are a few questions to consider as you establish a creative process:
- Will your team use AI for editing only, or will you use generative AI in your workflow?
- Will you publish 100% AI-generated images, or do will you add a certain level of human touch?
- How will you balance AI content with original content, curated content, or user-generated content (UGC)?
The concern is a universal one. In fact, Harvard Business Review recently wrote about it and concluded that AI is a tool to assist in creativity, not replace it.
Generative AI tools can assist in other aspects of the front end of innovation, including by increasing the specificity of ideas and by evaluating ideas and sometimes combining them.” (Harvard Business Review, July/August 2023)
In my experience, one of the best things about Canva’s AI tools is that they’re integrated into the app’s design tools. With Canva, it’s easy to use AI to create or edit an image—and then add to it and make it unique to your brand in the same app.
2. Possible inaccuracies
Nearly every AI tool has a disclaimer that the technology is new and may not produce completely accurate results. Take these statements seriously. AI content often includes errors that you have to identify and fix manually.
For social media managers, publishing inaccurate content can cause customer confusion and even lead to distrust in the brand.
So, you’ll need to make sure to check your results. After all:
“No matter how impressive a piece of computer-created poetry or artwork might be, it’s always built from blocks carved out of the data that’s used to train it. In other words, it isn’t genuinely capable of what we would call “original thought” – having new ideas of its own.” (Forbes Business Journal, “The Intersection of AI and Human Creativity“)
To avoid these issues, create a simple checklist for your social media team.
- Research the subject before using AI tools. In other words, say you want to use AI to generate a photo of a destination like La Jolla Cove. Browse photos from trusted sources first to ensure you know how the scene should look.
- Engineer prompts as specific as possible. Use the research you’ve done to add more details to your prompt. Instead of using “photo of La Jolla Cova,” try something like “sea lions at La Jolla Cove with big waves in the background.”
- Get sign-off from at least two team members. After generating an AI image, do a thorough check to look for errors. Once the content has passed your test, have another team member sign off before publishing.
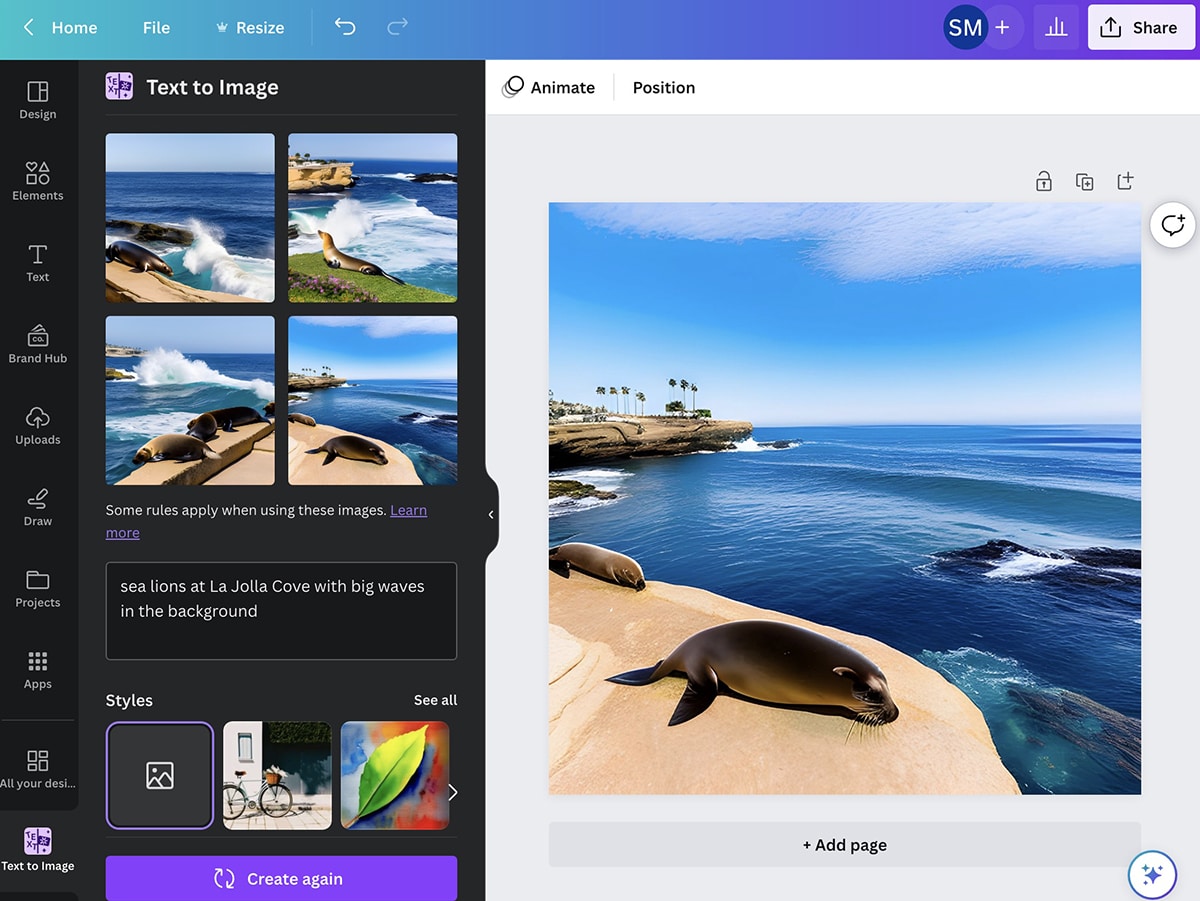
Example of Canva AI
Note that Canva’s terms of service prohibit users from passing off AI-generated images as their own human-generated creations.
3. Perpetuating biases
AI tech creates new content by learning from existing images, so biases that are present in existing images may appear in the AI content you create.
As a human marketer using AI, it’s your responsibility to take steps not to perpetuate these biases.
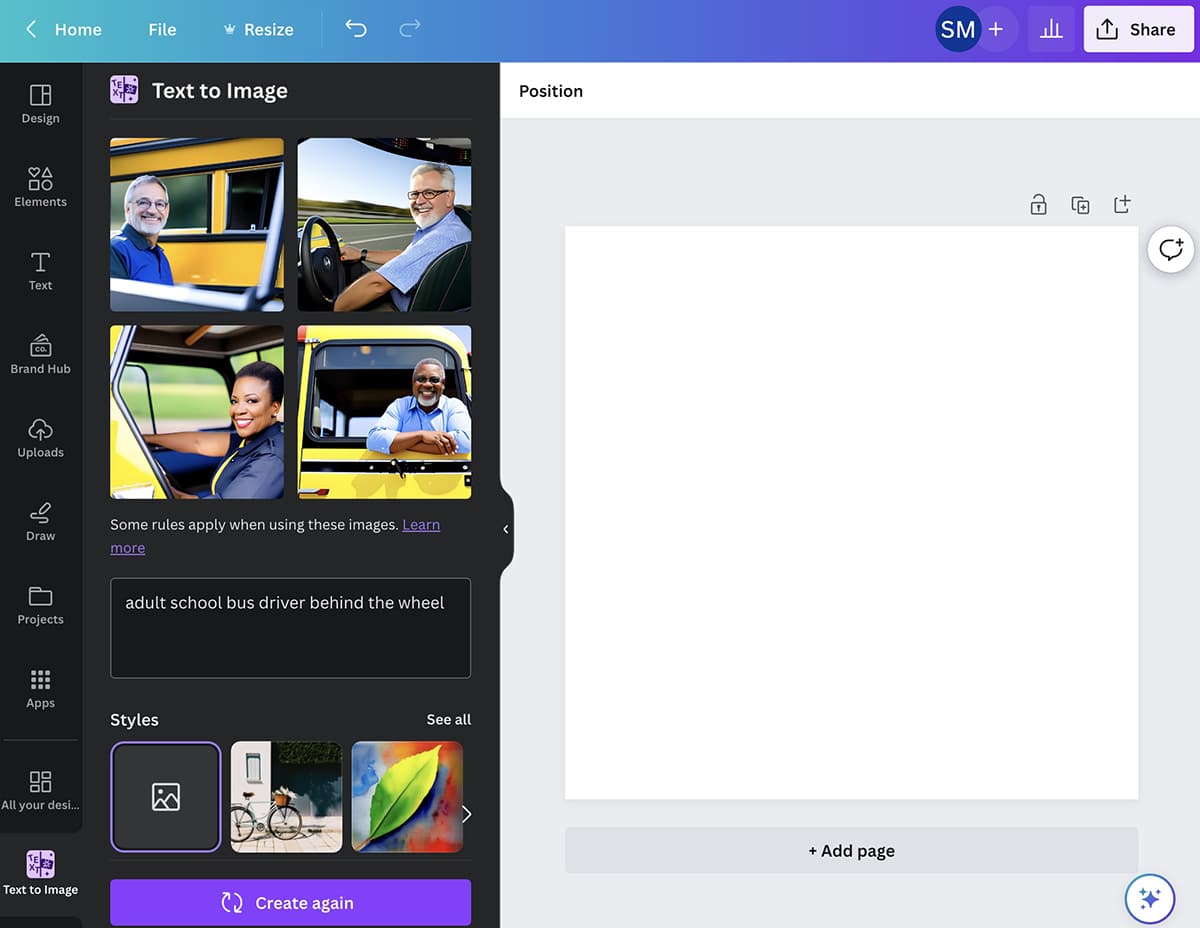
For example, say your client needs some of images of bus drivers to use in social media campaigns. If you notice that a lot of the results look pretty similar, use more descriptive terms to create content that’s less biased and more inclusive.
Note that Canva prohibits people from using AI tools to create harmful content.
Six Canva AI Tools That Social Media Marketers Should Try
Now that you have your process in place, you’re ready to start using Canva’s AI-powered design tools. As of May 2023, many of these are free tools—but some require a Pro subscription.
Quick look at Canva AI tools for social media marketers
- Text-to-image generator
- Magic Design
- Magic Eraser
- Online Background Remover
- Magic Edit
- Magic Write
1. Text-to-image generator
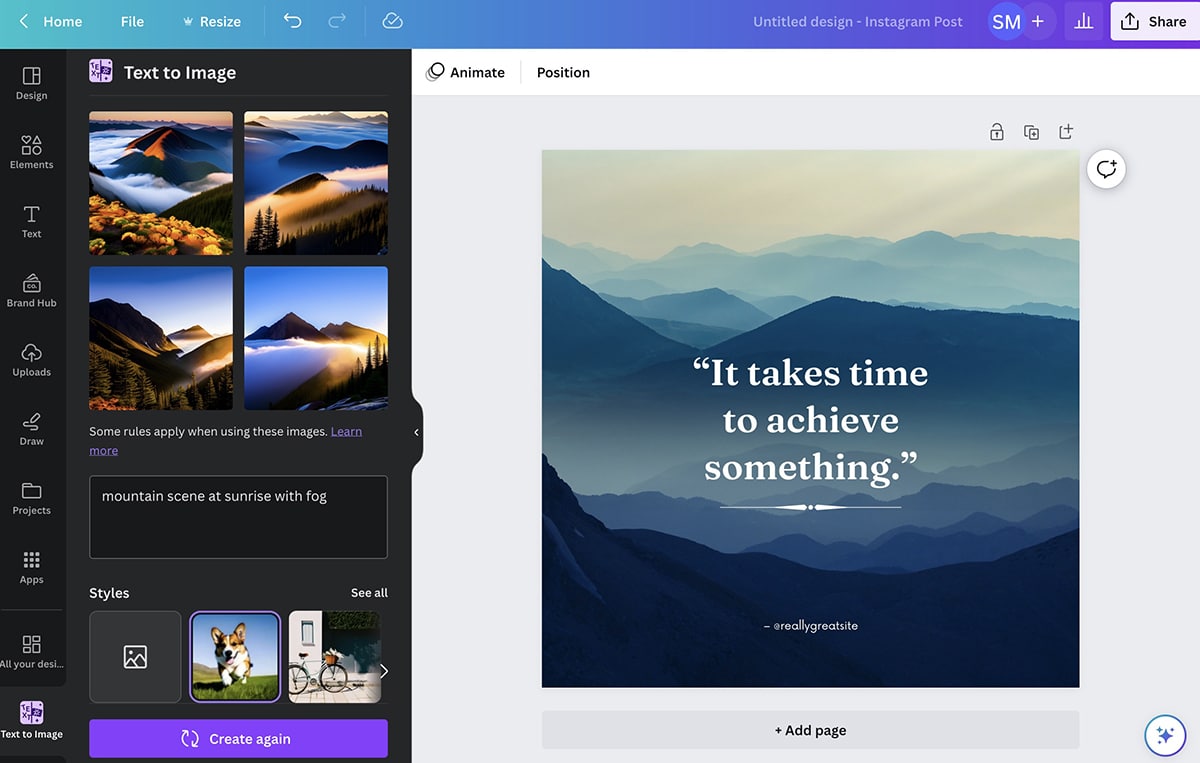
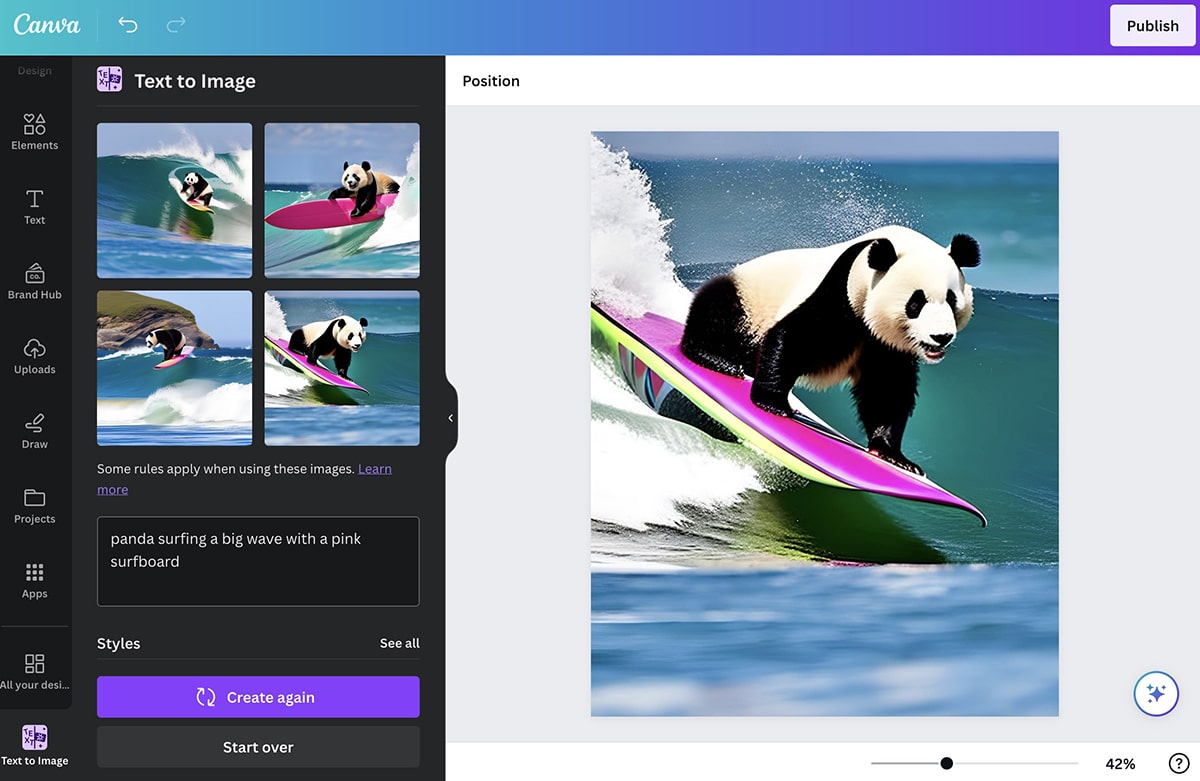
Canva’s text-to-image generator is a native app that creates photos and graphics from scratch. All you need is a text-based prompt—the more specific you make it, the better.
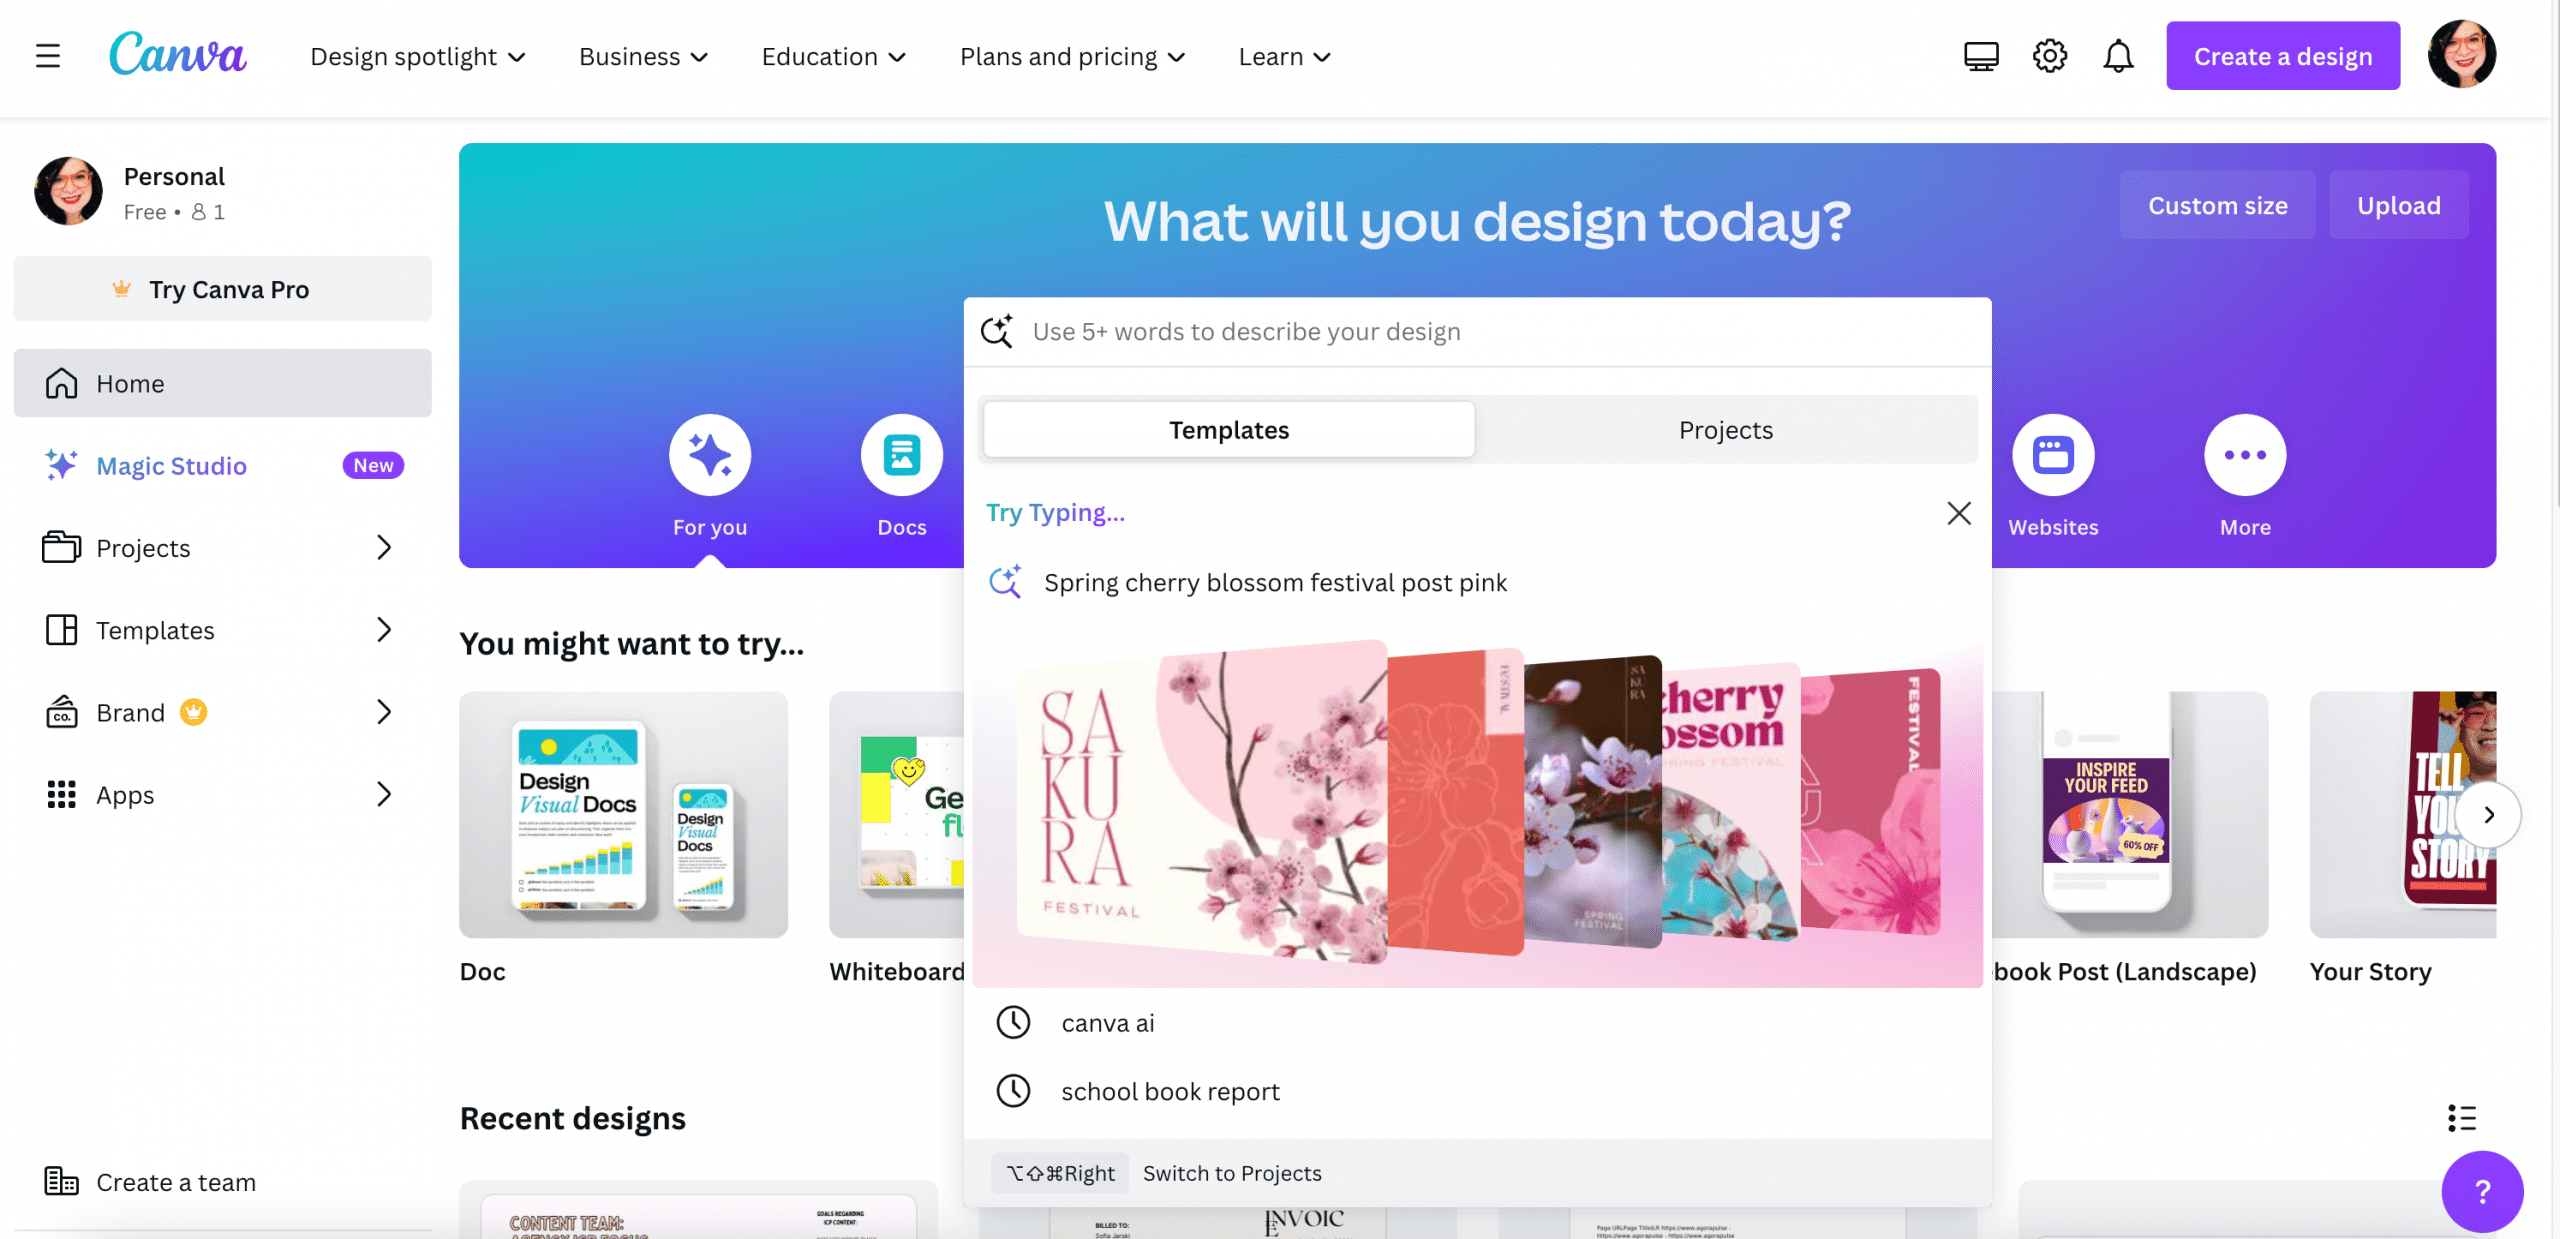
To get started, create a new design in Canva by clicking the Create a Design button on the main dashboard. For this example, we’ll use a square aspect ratio for an Instagram post. You can keep the design blank, or you can choose a template—or design a new one. For this example, we’ll use one of the Instagram post templates provided by Canva.
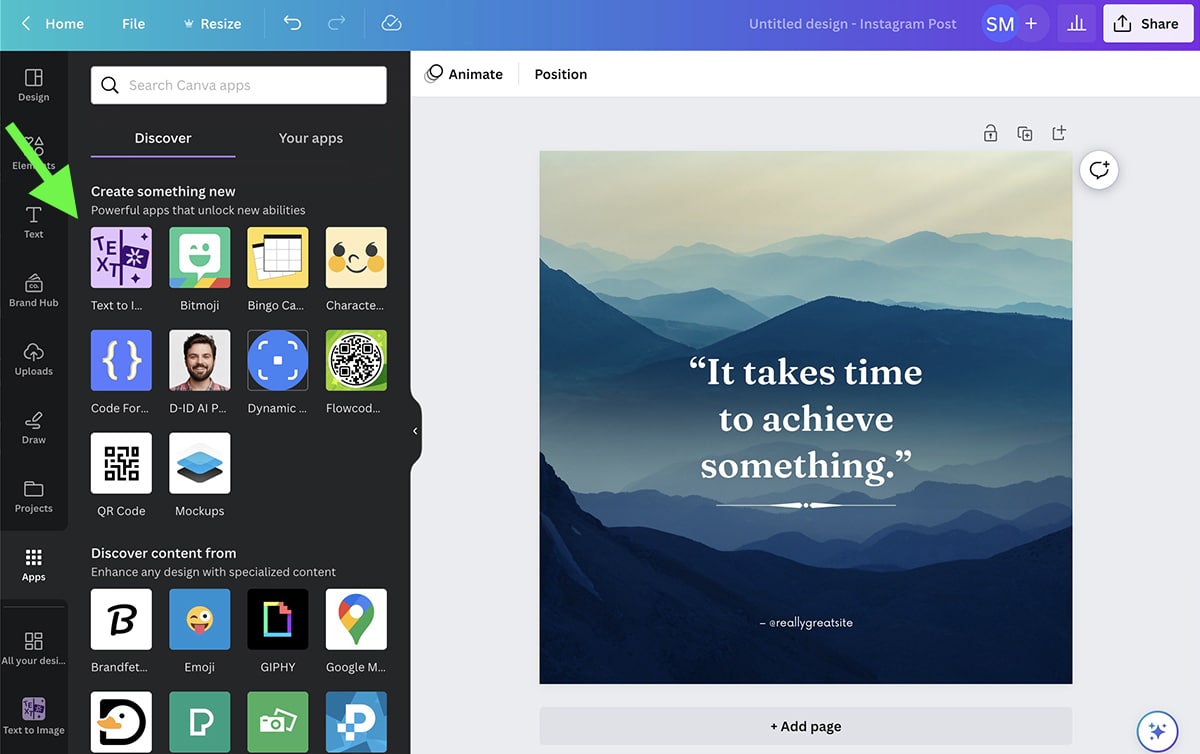
If you’ve never used the Text-to-Image Generator before, you can find it by selecting Apps in the left-hand toolbar. Find the app and click Use to add it to your toolbar.
Now you’re ready to feed it a prompt. Write out what you want the AI app to create, using as many details as you can. You can skip any style-related details since you’ll choose a style from the list.
Click Create Your Image and review the AI-generated images. If you like the results, you can add one or more to your design right away.
But if you don’t love what you see, you have a couple options. You can either click Create Again to give the same prompt another shot, or you can revisit the prompt or select a different style.
For this example, I tried a few different tactics. First I added “blue” to clarify the color palette I wanted. Then I experimented with several styles until I found one I liked.
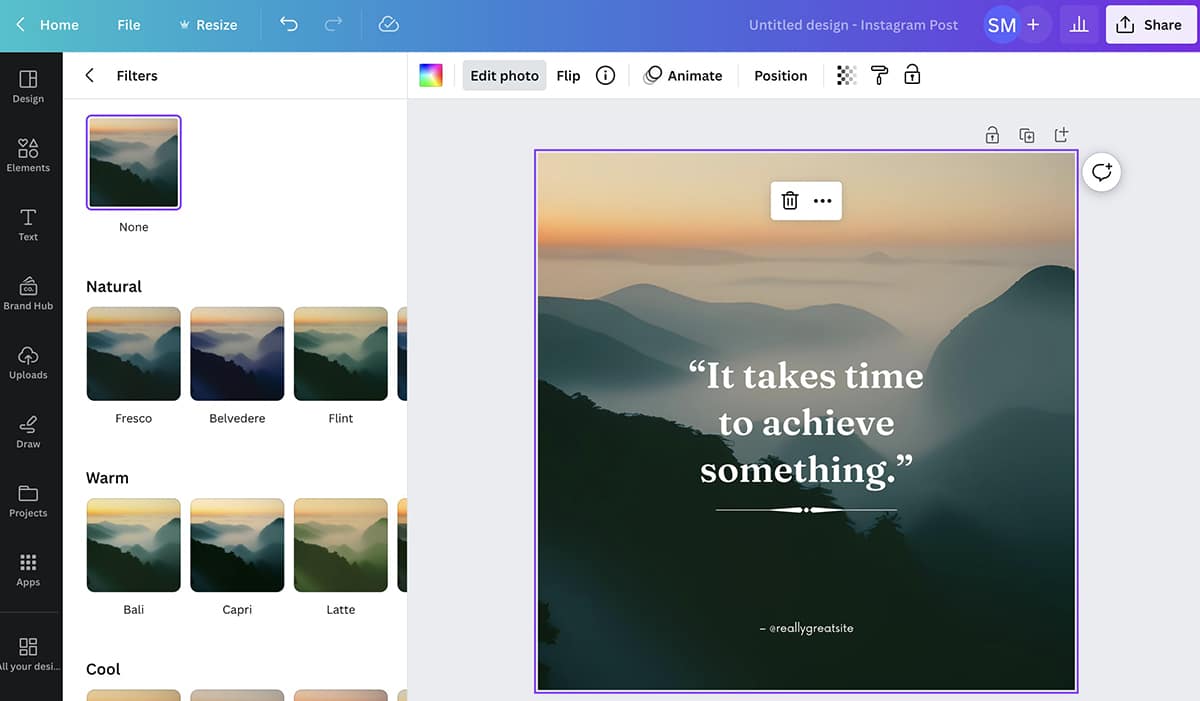
After generating an image, you can use your favorite design tips to edit it in Canva. For example, you can add filters, adjust settings, or change transparency levels. You can also animate images—a feature I often use to turn photos into videos.
2. Magic Design
Want to develop a template for your brand—but don’t have an in-house design team? If you don’t see anything you like in Canva’s template library, you can create one from scratch using Magic Design.
For this tool, you do need source material—like a product photo, lifestyle photo, or image that captures the essence of your brand. Open Magic Design from your Canva dashboard, and choose an image.
You can either upload a new image or choose from files you’ve already uploaded or generated. For this example, we’ll use a photo of a beach that I downloaded from a royalty-free image library.
Magic Design automatically generates about a dozen templates for various placements—from Facebook ads to mobile videos. You can click to start customizing any of the templates from this dashboard.
But if the results aren’t quite right for your brand, you can make a few small changes to improve all the templates at once. Open the Style dropdown to choose a different theme or color palette. You can choose themes like Luxury or Nautical, or you can pick one of the style packages.
You can also open the Headline dropdown and input the tagline or call-to-action that you want to include in all the templates. Keep adjusting until you get results you like.
Then click to edit or download the design in Canva. If you have a Canva Pro account, you can easily resize the design to work across different placements.
3. Magic Eraser
Need to make a quick change to an image or graphic? With Magic Eraser, you can edit out objects and imperfections, or fill in backgrounds in seconds.
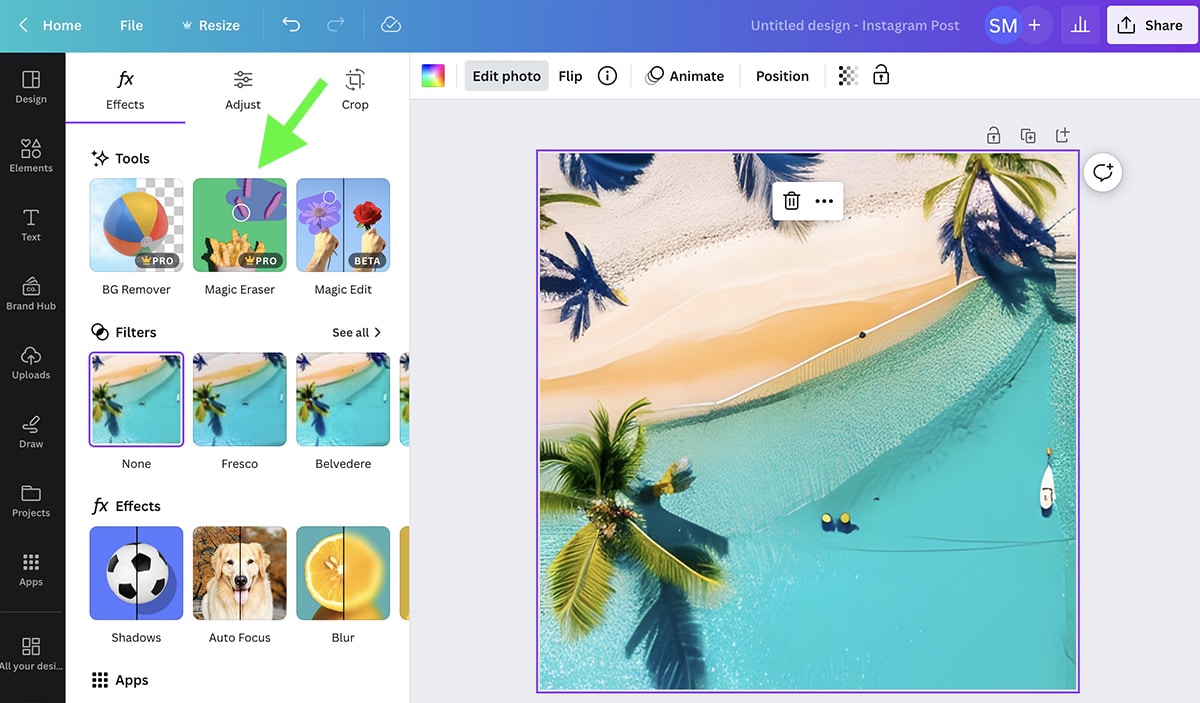
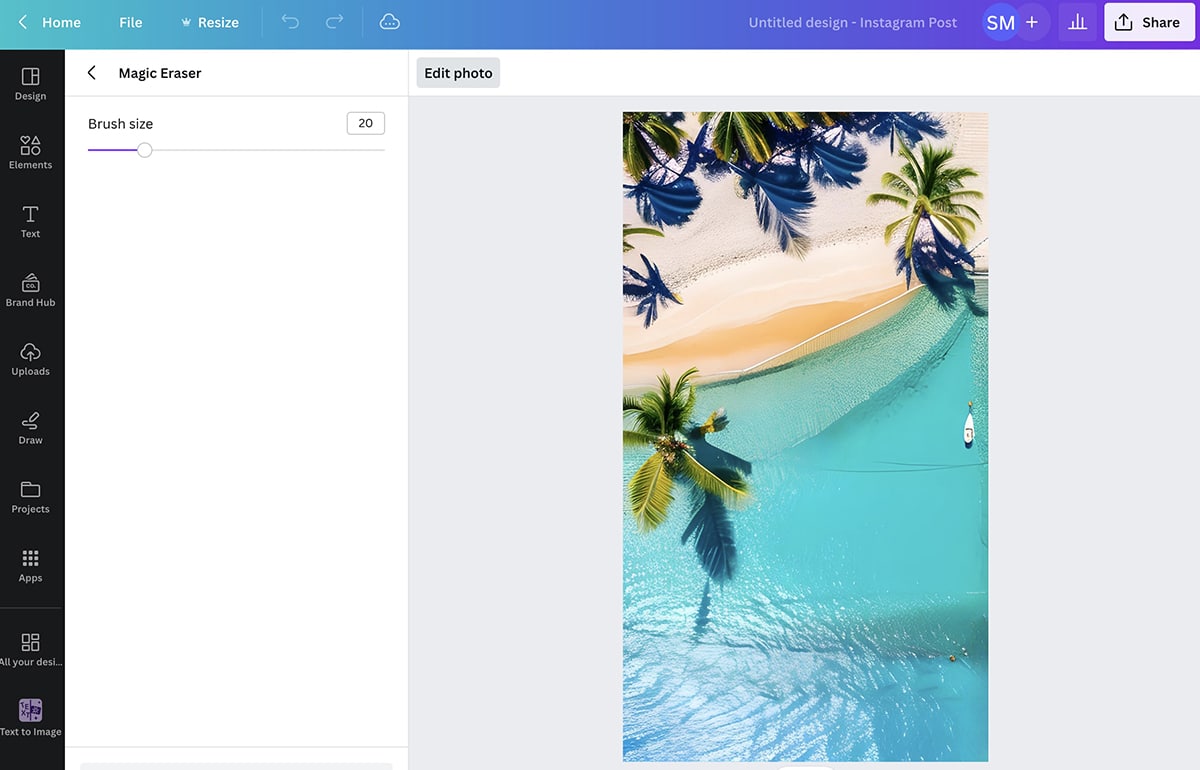
To access Magic Eraser, open the design you want to edit. Click on the image you want to edit and select Edit Photo. Then select the Magic Eraser from the editing toolbox.
Check the brush size for the Magic Eraser, and brush over the area you want to edit. As soon as you stop brushing, the AI tool automatically starts working to remove and fill in the area.
In this example, we’ll remove the people and some other imperfections in the AI-generated image I created with Canva’s Text-to-Image generator.
To remove the edits you made, click Reset Erasings and try again if necessary. To save the results, click the left arrow and return to the editing dashboard.
4. Background Remover
If you need to remove more than just a few spots here and there, use Canva’s Background Remover tool. Available with a Pro plan, this AI tool is automatically swaps out the background content of images.
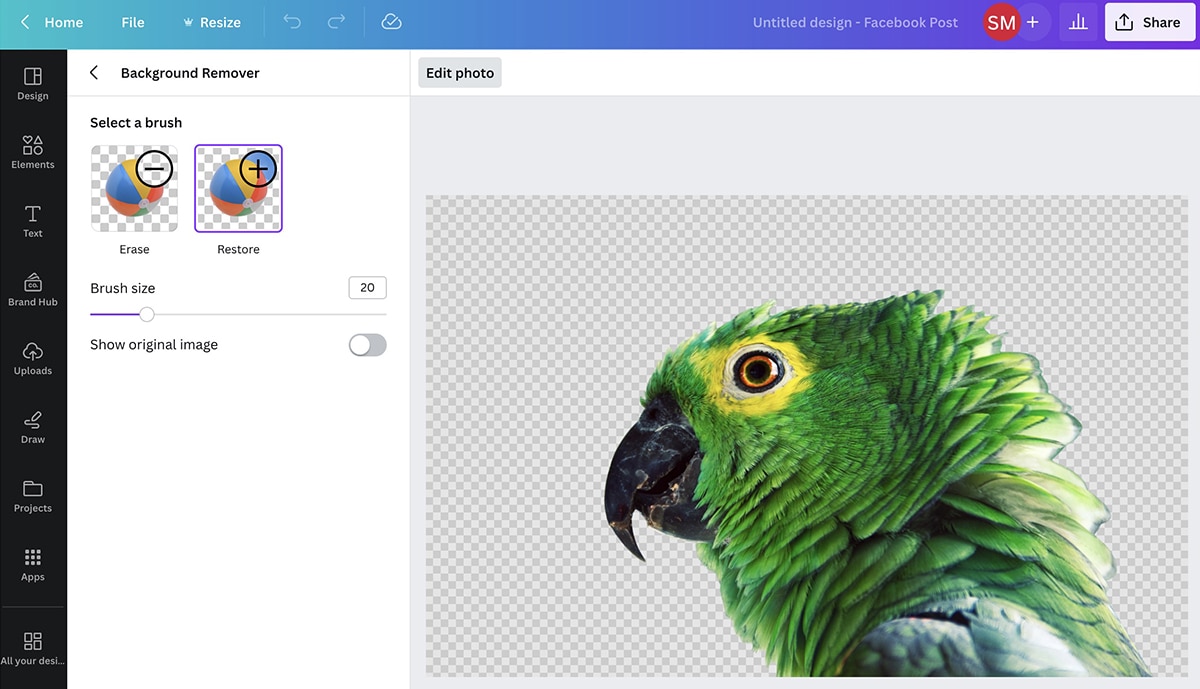
To use the tool, create a new design and click to edit the image. Select BG Remover from the toolbox. Then give it a few seconds to isolate the subject and remove the background.
Click the tool again to apply additional edits. Here, you can click to remove additional bits of the background or restore objects that were removed accidentally.
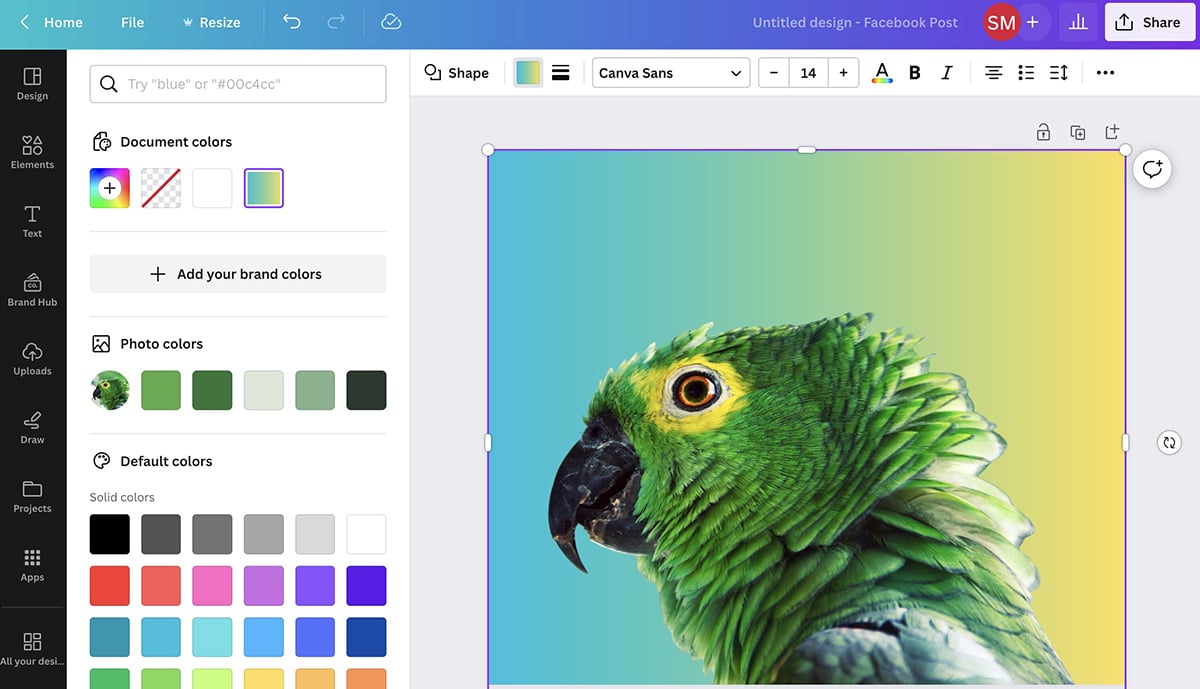
After applying the changes, you can return to the editing dashboard to make other types of edits. For example, you can fill in the background with a solid color—like one of the auto-generated suggestions. Alternatively, you can add another image in the background as a green screen.
5. Magic Edit
Need to replace elements in your image instead of simply removing them? With Magic Edit, you can easily make existing photos more compelling. As of May 2023, this AI tool is free to use.
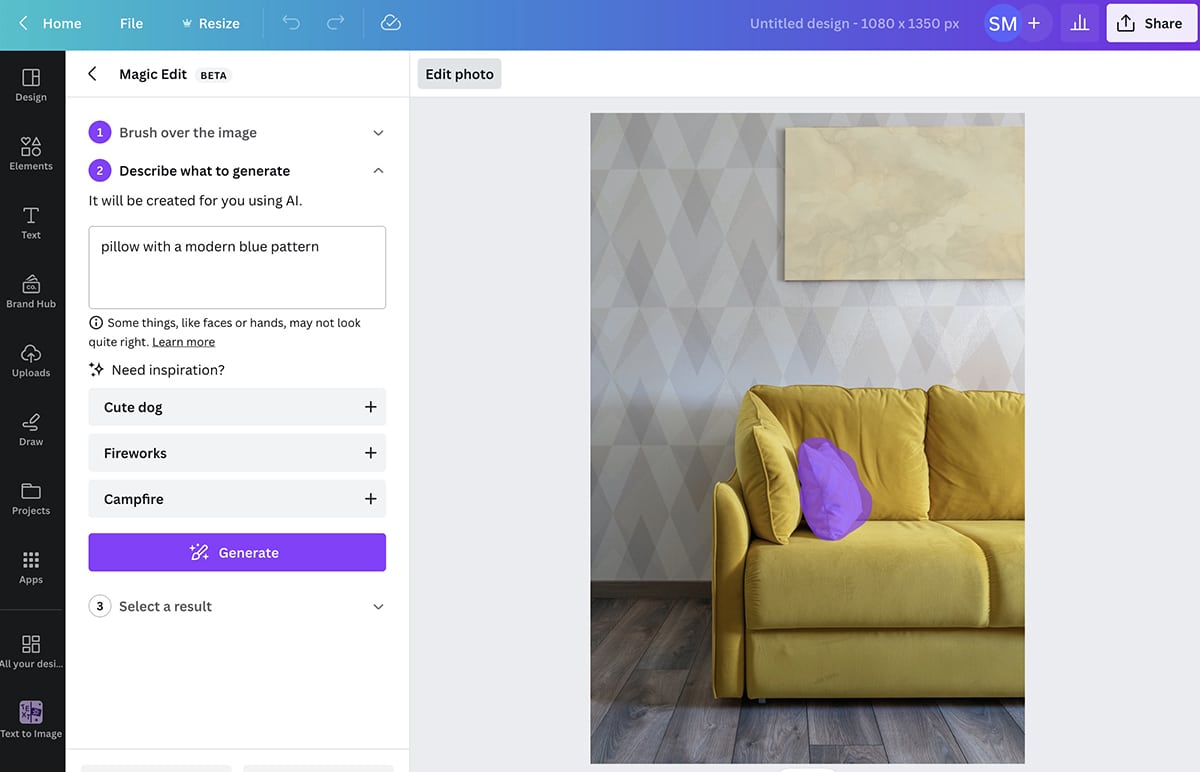
To start, create a design in Canva and click to edit the image. Select Magic Edit from the AI suite, and then brush over the area you want to edit.
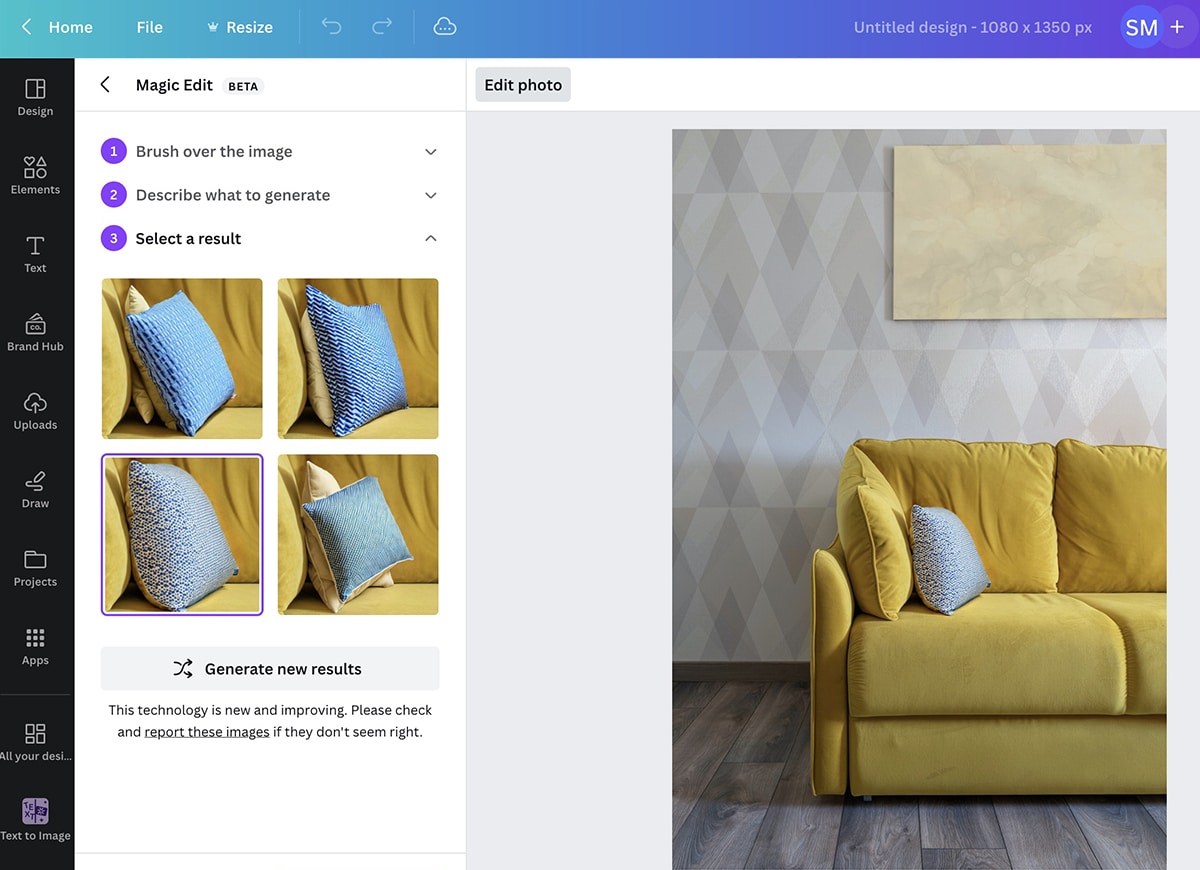
Then type what you want to add in its place. For this example, we’ll replace the existing pillow with another that has a bolder pattern.
Click Generate and review the options. Similar to the other tools, you can try again or redo the prompt if you don’t like the initial results.
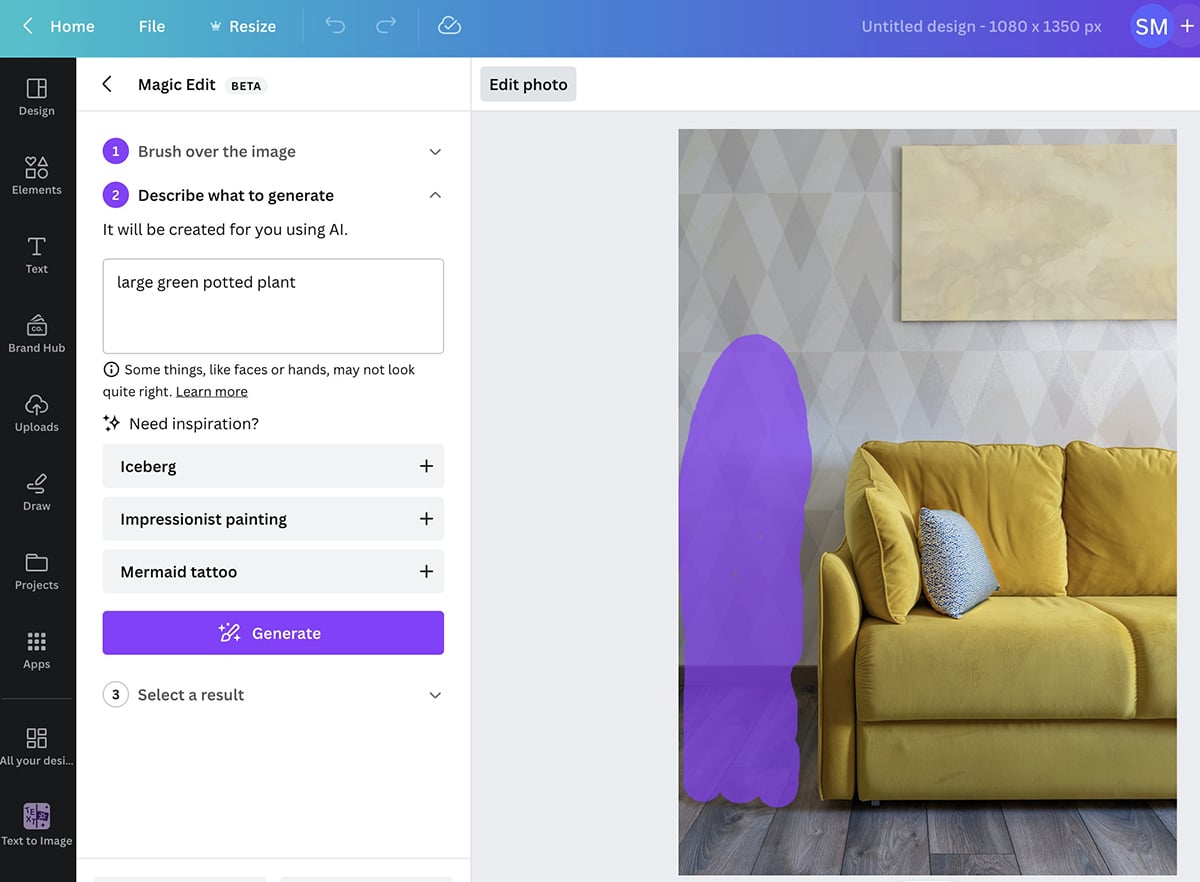
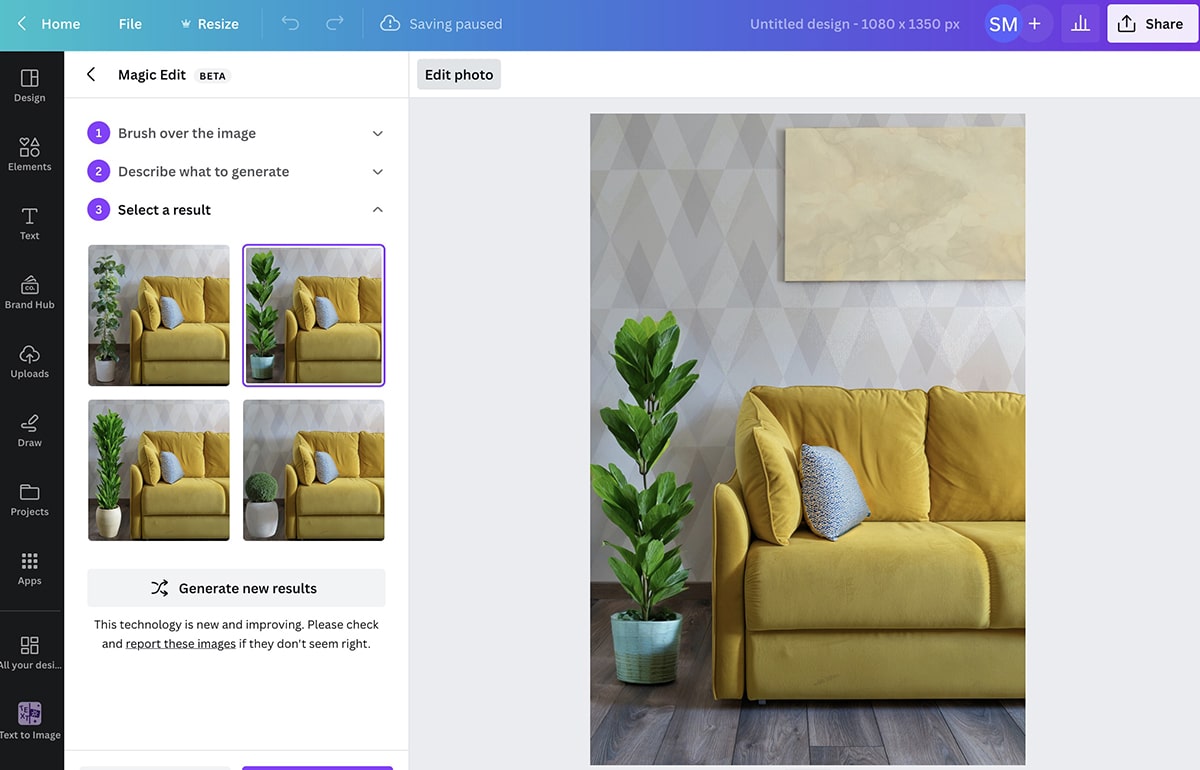
Using Magic Edit, you can keep adding to images. For example, we could add a potted plant to this scene to fill the empty space and make the room more interesting.
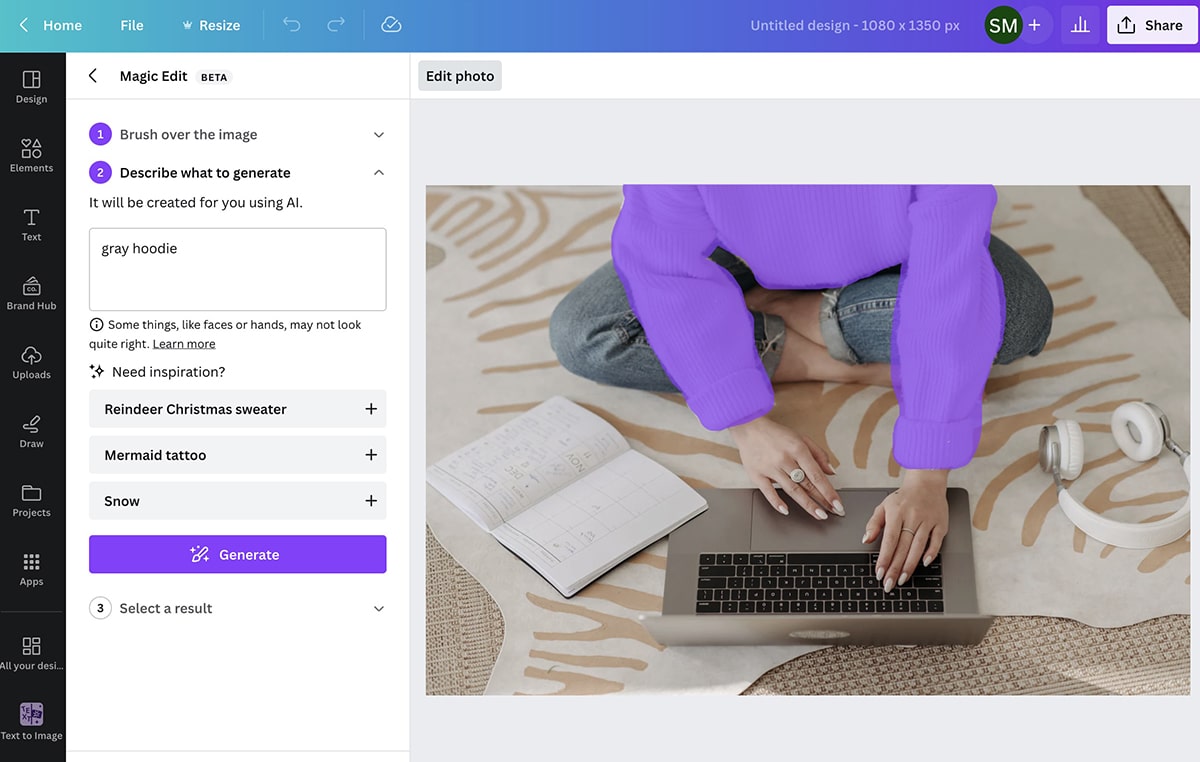
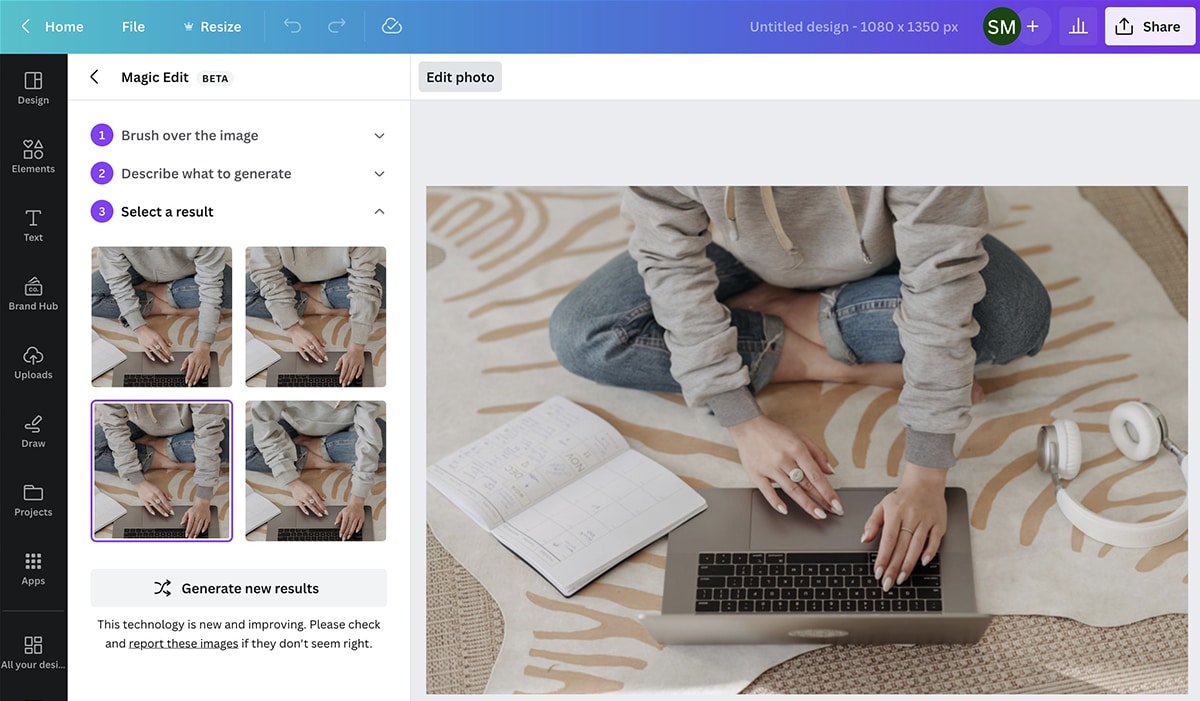
Magic Edit also works on clothing.
For example, we could replace the white sweater in the stock photo above with a gray hoodie to fit a different aesthetic.
6. Magic Write
Most of Canva’s AI features focus on image-based edits. But if you need a hand with writing captions or text overlays, Magic Write can help.
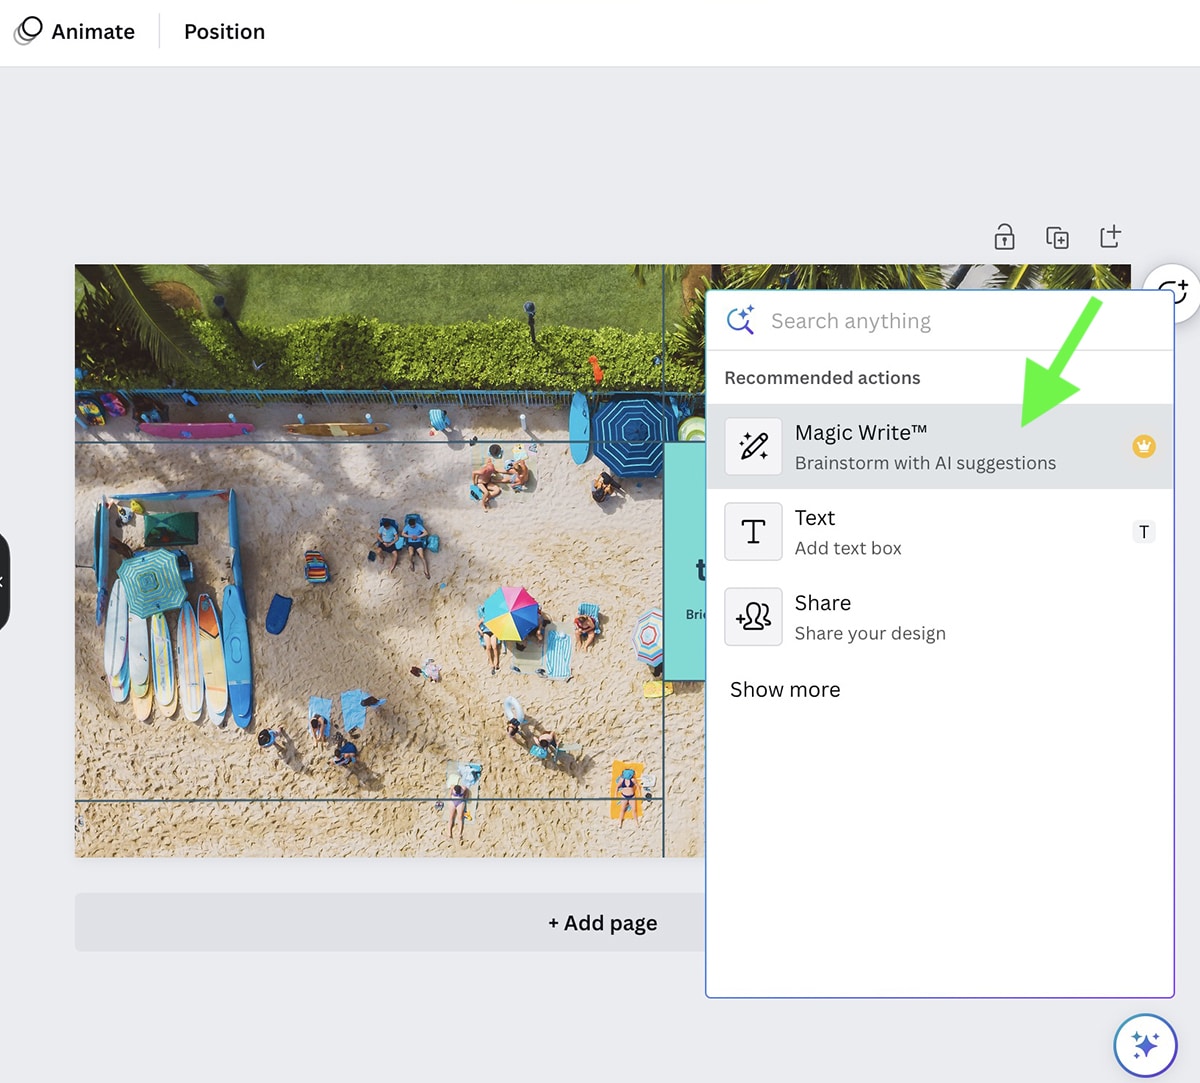
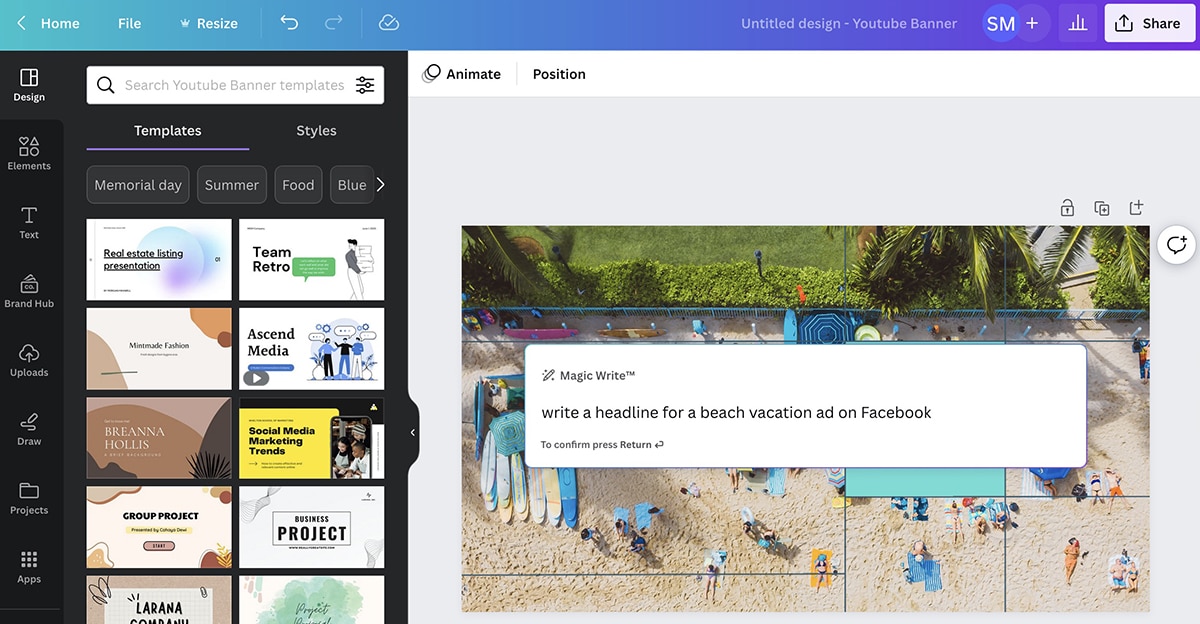
You can access Magic Write by clicking the star button in the lower right corner of any Canva project. Select Magic Write from the list and enter your prompt.
Note that any text the tool generates will appear as a text overlay on your current design. So if you want to brainstorm captions, create a new document that’s exclusively for text and use Magic Write there.
But if you want to add a catchy headline or call-to-action to a graphic, just edit the AI-generated text to fit on the image. Make sure to review the text carefully for accuracy and brand voice. If it doesn’t sound quite right, you can edit the prompt to add more details and style notes.
How to Publish Canva’s AI Images With Agorapulse
Thanks to Canva’s Agorapulse integration, you can seamlessly publish your AI-generated images (or any designs, really) to your social media accounts. You can choose between creating in the moment or uploading designs to publish later.
Upload Canva designs to your Agorapulse asset library
Want to take your social media scheduling process one step at a time? You can easily import images from Canva to your Agorapulse asset library—and then turn them into posts later. This option works well if you collaborate with a design team or an assistant who creates images for you in a shared Canva account.
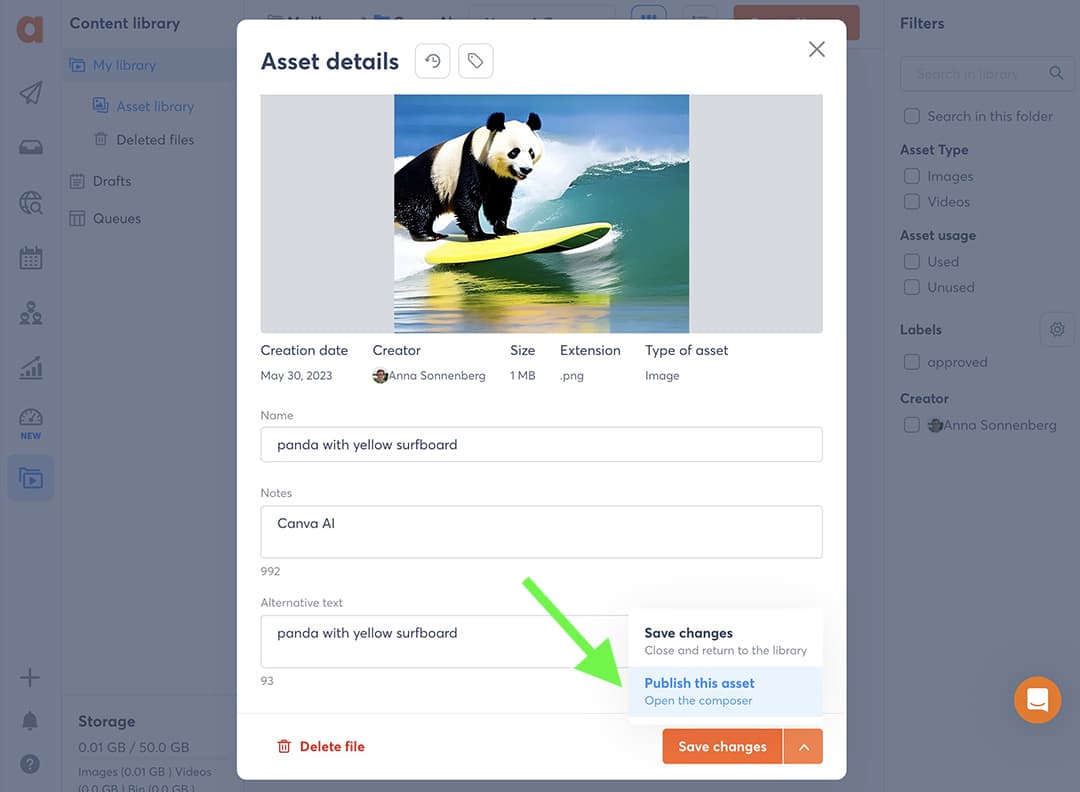
First, open your Agorapulse dashboard and go to the Asset Library. Find the folder where you want to upload images, or create a new folder to organize your content.
If you’ve already designed your images in Canva and exported them to your device, click Upload File(s) and add them to the folder. After uploading, you can add alt text, notes, and tags to the assets in your library to keep track of them.
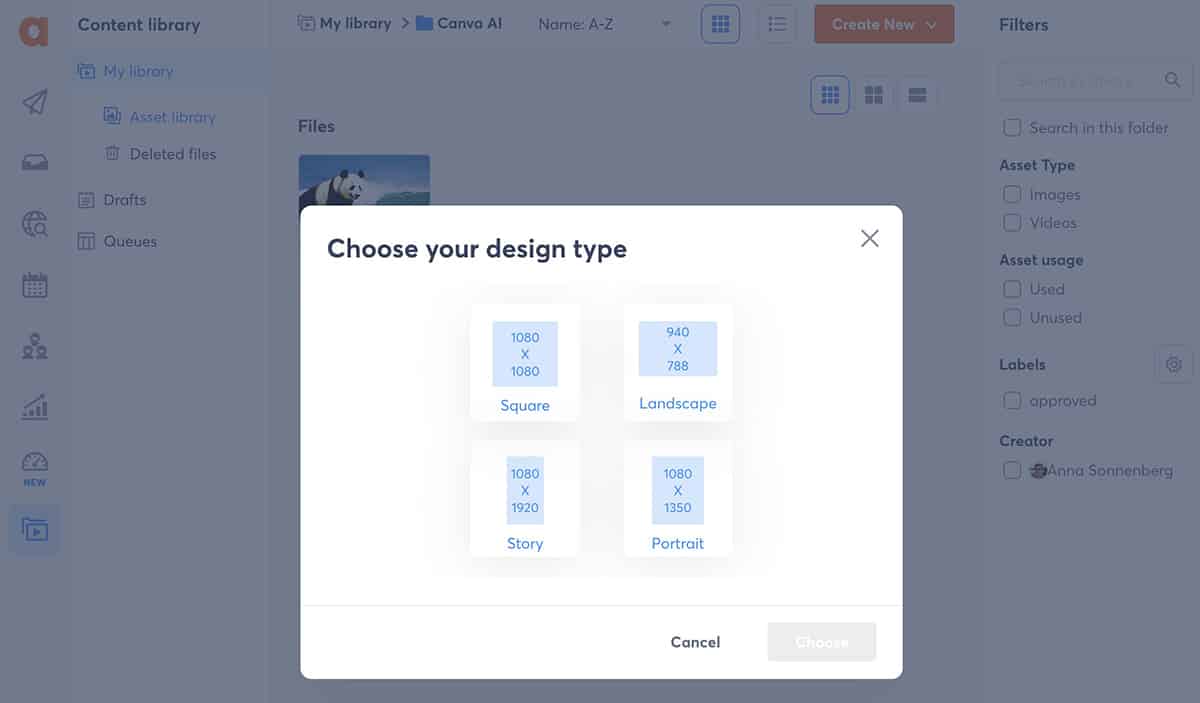
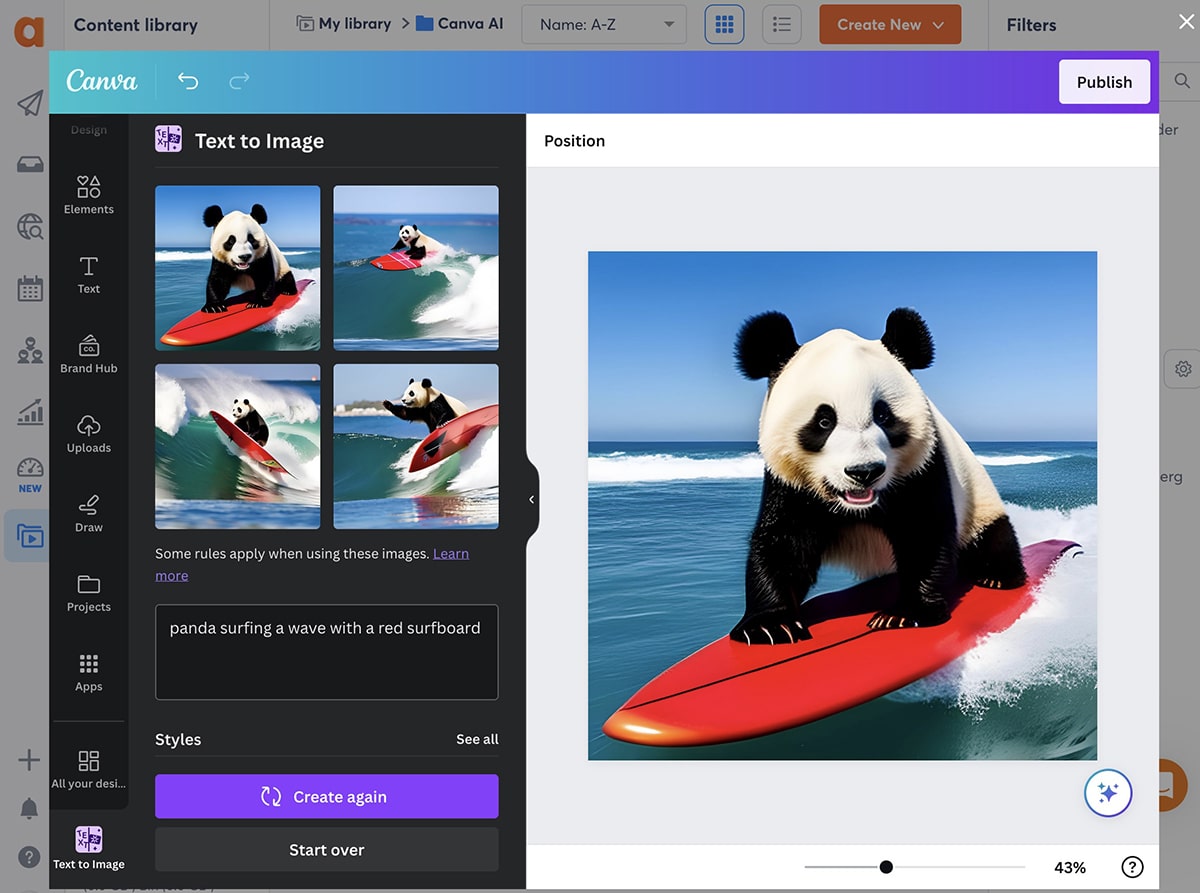
If you haven’t designed your images yet, click the Create New button in the upper right corner and select Design With Canva. Then choose the image size you want to create. A Canva popup will automatically open from your Agorapulse dashboard.
From here, you can access all of Canva’s creative tools. For example, if you want to upload an AI-generated image, select the app in the toolbar. Then start creating. Note that you can also access existing designs by selecting Projects from the menu.
When you’re finished designing, press the Publish button to add the image to your Agorapulse asset library. Repeat the process until you’ve designed all the assets you need.
Try Agorapulse now for FREE!
Publish Canva AI designs from your Agorapulse asset library
When you’re ready to turn your Canva designs into posts, you can open them from the asset library and click Publish This Asset. You’ll automatically be redirected to Agorapulse’s post composer.
All you have to do is select the social media account where you want to publish and continue creating the post.
Do you want to add multiple Canva AI images to your post? Click the plus sign in the post composer, and select Upload From Library. Then choose the rest of the assets you want to add to the post.
When you’re finished, publish right away, schedule for later, or save as a draft—just like you would with any post in Agorapulse.
Design with Canva as you publish posts with Agorapulse
Prefer to tackle the entire social media content creation process at once? You also have the option to design with Canva directly from the Agorapulse post composer.
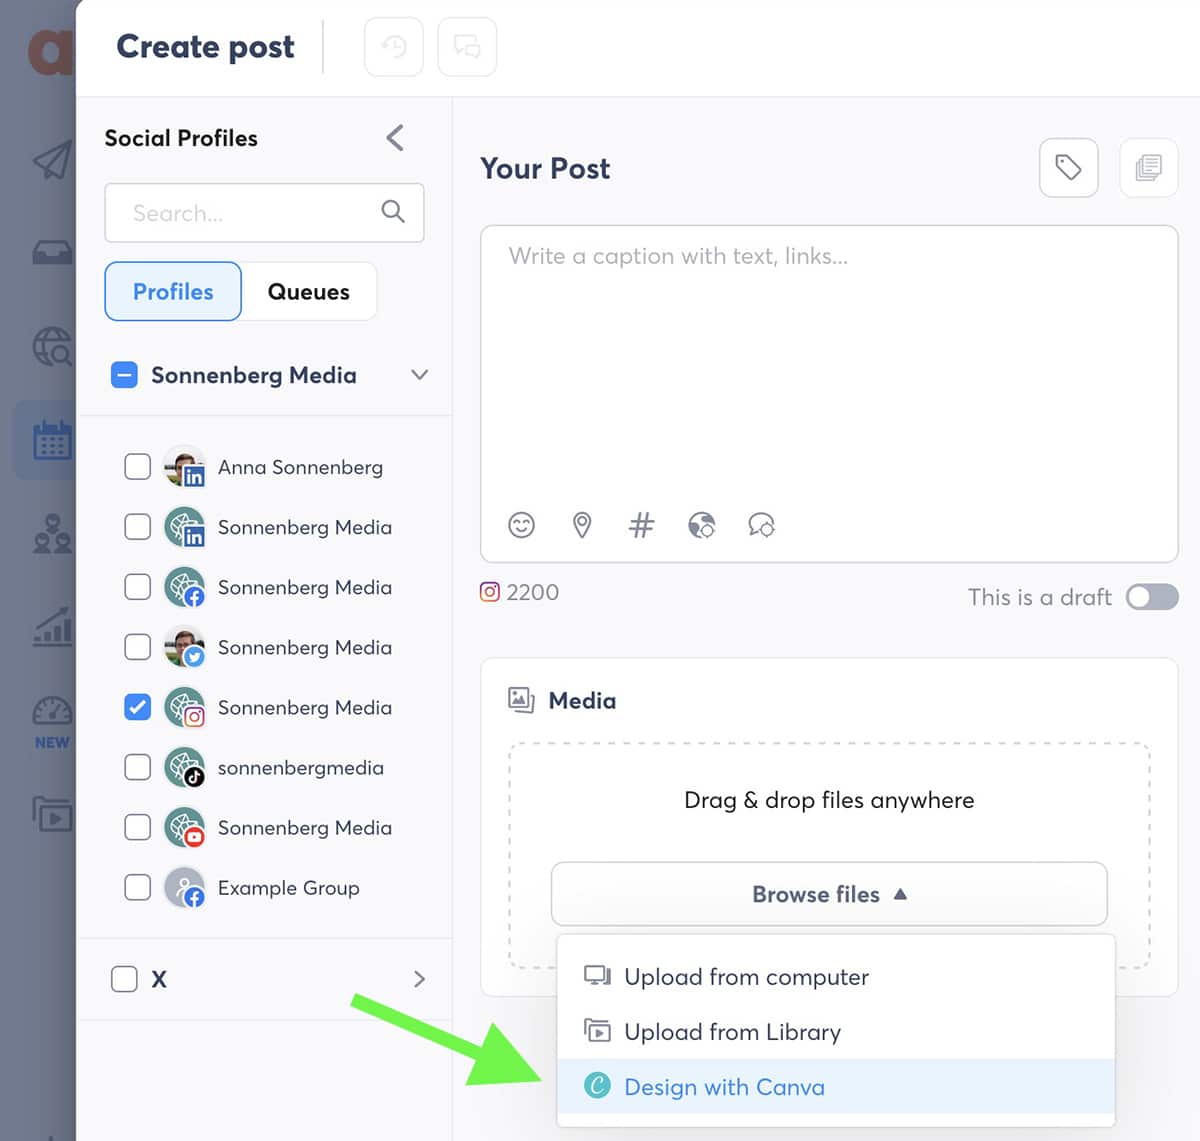
Open the post composer and click the Browse Files dropdown. Then select Design With Canva to open the design app directly in the post composer.
Select a design type, and use the steps above to create an image for your post. Then click Publish to import the content directly to Agorapulse. To add multiple images, click the plus icon and select Design With Canva to repeat the process.
Then finish publishing your post. You can schedule content minutes, days, or years in advance with Agorapulse—or you can publish to social media instantly.
Wrapping Up What We Learned About Canva’s AI Tools and Agorapulse Integration
Whether you want to make a quick edit to a photo or you want to generate an image from a prompt, Canva’s AI tools can simplify your social media content creation process. Since Canva integrates with Agorapulse, using these two tools together lets you level up your social media workflow and publish eye-catching content faster.
Start publishing, monitoring, and scheduling all your amazing content with Agorapulse right now. Sign up for a free trial to find out how.
