It’s rare for a prospect to convert on the first visit. Only 2% do. But that doesn’t mean you’ve lost them entirely, that you should just move on.
A well-placed and well-timed retargeting ad can bring them back. And since they’re familiar with you now – your company, your product, your brand – they’re statistically more likely to buy. You just have to reach out to them.
And a Facebook ad is the perfect way to do it.
That’s why we spoke about Facebook retargeting last month. We defined it, surveyed the industry at large, and introduced the social network’s two platforms for retargeting – Facebook Exchange and Website Custom Audiences.
We’re going to talk about the latter one today, the self-serve tool.
We’ll teach you how to run a Website Custom Audience campaign from the ground up, so you can start retargeting – and converting – the ones that got away.
Fire up Facebook. We’ll meet you there.
1. Building Your Audience
Naturally, the first thing you need to do is actually create a Website Custom Audience.
It doesn’t matter if you prefer Ads Manager or Power Editor, as they both work and the process is (nearly) the same. You just take separate routes to arrive at the Create Audience dialog.
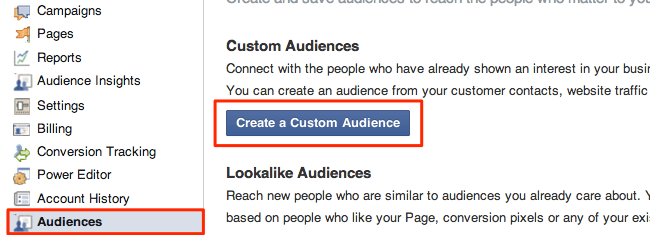
On Ads Manager, start at the home screen and then select Audiences in the left sidebar, which brings up a section on the right with two options – Custom Audiences and Lookalike Audiences. Click Create a Custom Audience.
On Power Editor, it takes a bit longer.
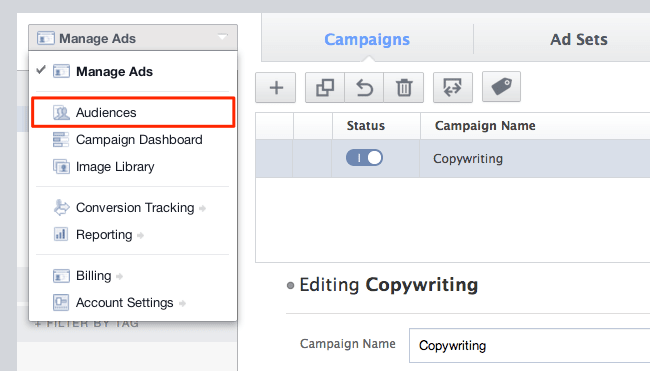
From the home screen, activate the Manage Ads drop-down menu in the upper left-hand corner.
Select Audiences.
Next, open the Create Audience drop-down menu (just beneath the Audiences one).
Click Custom Audience.
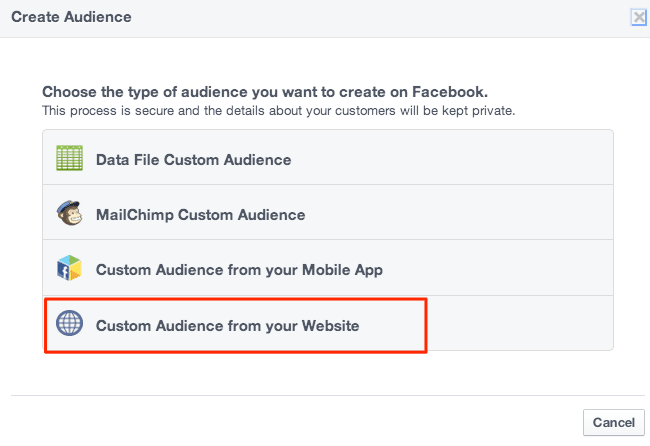
Now, whether you’re on Ads Manager or Power Editor, you’ll see the Create Audience dialog.
Select Custom Audience from your Website.
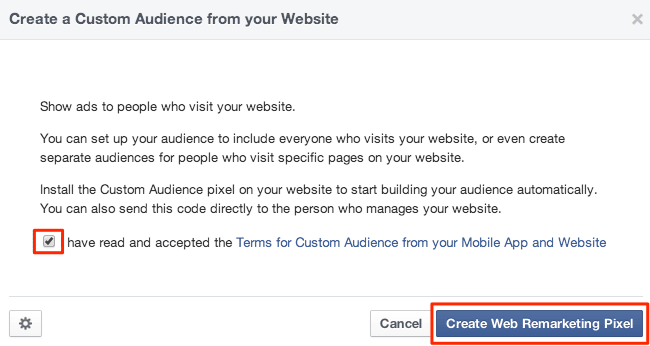
You’ll see a terms and conditions dialog.
Accept and click Create Web Remarketing Pixel.
You’ll see your pixel now. Be sure to save it – either in a file or an email (Send the code to your website developer).
After that, click Create Audience.
On the next screen, you have a few things to do.
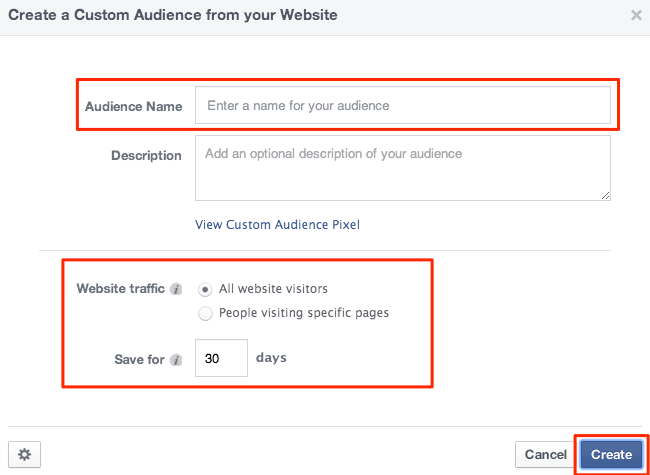
First, name your audience. Make sure you can readily identify the name, so you don’t have to cycle through all of your audiences to find what you’re looking for. You can add a description if you’d like – it’s not compulsory – but turn your attention afterward to the Website traffic section.
Here, you can select who to retarget. Are you interested in going after all your site visitors, or just those who loaded one of a few pages? If it’s the latter, select the radio button for People visiting specific pages.
You can use “And” as well as “Or” logic to target by URL, path, domain, or keyword.
The duration of the retargeting campaign is automatically set to 30 days, but it can be as short as 1 day or as long as 180 days.
Click Create.
2. Installing Your Pixel
Remember the pixel you saved earlier? Take it and go into your website’s source code.
There, add the pixel in your site before you close the header tag. Ideally, it should be placed in a common header or template.
You’ll use the same pixel for every website custom audience on your Facebook account, because Facebook only gives you one pixel to work with.
If you happen to own multiple sites and would like to retarget on all of them, you can build several audiences and then filter them by URL. Just select the People visiting specific pages radio button (see above image) and then URL contains in the drop-down menu that appears. Add the relevant site in, then create a second audience and it’s all rinse and repeat. This way, you can separate your retargeting prospects by the sites they actually visit.
Once that’s done, it pays to double-check your work.
To make sure you got it all right, consider a well-reviewed chrome extension called Facebook Pixel Helper. It’ll tell you how many Facebook Ad pixels are on any particular webpage (including those of your competitors). If it doesn’t register any pixels when you load your pages, you’ll know you’ve made a mistake.
Now, whenever a person visits your site they’ll get a cookie from your Facebook pixel and get added to your audience list.
Thankfully, these visitors don’t need to be logged into Facebook while they’re browsing your site. The process works either way.
From here, it’s a waiting game. If you have an extraordinarily active website or you’d only like to retarget a few prospects, it won’t be a long wait. But many of us ought to set aside a few days at least to build up a suitable pool of users. Be sure to build time into your Facebook advertising schedule for this to happen.
3. Deploying Your Ad
This is the easy part.
Access Power Editor or Ads Manager as usual. However, when it comes time to select an audience, load the Website Custom Audience you just built.
Here’s how you do it in Ads Manager.
And in Power Editor.
Now, just follow your usual ad routine. Except this time, your audience will be users who visited your site instead of Facebook users you categorically selected, or emails you uploaded from your CRM.
But don’t forget to make sure your creative reflects the retargeting nature of your ads. We’ll speak more on that in a later post.
And that’s it!
You’ve just created a Website Custom Audience, installed the pixel in your website, and deployed a retargeting ad.
Let us know how it went in a comment below!


